A handmade tie is more than just an accessory — it’s a personal statement of style and craftsmanship. Learning how to sew a tie allows you to create a custom piece that reflects your taste, whether it’s a sleek silk tie for formal occasions or a bold cotton pattern for casual wear. While ties are small, their construction requires attention to detail, making them a satisfying project for both beginner and experienced sewists.
This guide walks you through everything you need to know about sewing a tie from scratch. From selecting fabrics to achieving a professional finish, you’ll discover step-by-step techniques and creative ideas to help you craft ties that rival store-bought designs.
Contents
- Why Sew Your Own Tie?
- Understanding the Anatomy of a Tie
- Essential Tools and Materials
- Choosing the Right Fabric for a Tie
- Cutting the Fabric on the Bias
- Creating a Tie Pattern
- Step-by-Step Guide: How to Sew a Tie
- Advanced Tie-Making Techniques
- Customizing Tie Styles
- Matching Ties to Outfits
- Troubleshooting Common Issues
- Caring for Handmade Ties
- Creative Tie Ideas
- Practicing Your Skills
- Final Words
Why Sew Your Own Tie?
Personalization and Style
Sewing your own tie gives you freedom to choose fabric, width, and length that best fits your wardrobe and personal style.
Cost-Effectiveness
High-quality ties can be expensive, but making your own lets you achieve premium results without the hefty price tag.
Skill Development
Sewing ties helps refine precision skills like pressing, cutting on the bias, and hand-finishing techniques.
Understanding the Anatomy of a Tie
The blade
The wider front section that is most visible when worn.
The tail
The narrower back section that stays tucked behind the blade.
The tipping
The small fabric pieces at both ends of the tie, usually in a contrasting or matching material.
The interlining
A piece of fabric inside the tie that provides structure and weight.
The keeper loop
A small fabric loop sewn to the back of the tie to hold the tail in place.
Essential Tools and Materials
Sewing machine and hand-sewing needles
A sewing machine makes construction faster, but many finishing details are done by hand for a polished result.
Fabric
- Silk for classic, elegant ties.
- Cotton or linen for casual, lightweight options.
- Wool blends for winter ties.
Choose a fabric with some drape for a professional look.
Interlining
Wool or cotton interlining gives ties their structure and helps them hang neatly.
Thread and notions
Matching thread, pins or clips, and a seam ripper are essential. Optional extras include labels or decorative stitching.
Cutting tools
Sharp fabric scissors or a rotary cutter ensure clean edges.
Choosing the Right Fabric for a Tie
Weight and drape
Avoid fabrics that are too stiff or too flimsy. The fabric should bend easily but hold its shape.
Patterns and prints
Stripes, plaids, or novelty prints can add character. Remember that ties are cut on the bias, which alters how patterns appear.
Prepping the fabric
Pre-wash cotton and linen fabrics to avoid shrinkage. Silk and wool should be pressed and stabilized before cutting.
Cutting the Fabric on the Bias
Why bias cutting matters
Cutting fabric at a 45-degree angle to the grain gives the tie flexibility and a natural drape around the neck.
Steps for bias cutting
- Lay the fabric flat.
- Use a square ruler to find a perfect 45-degree angle.
- Place your tie pattern on the bias and cut carefully.
Creating a Tie Pattern
Standard tie dimensions
- Length: Approximately 57 to 60 inches.
- Width: 3 to 3.5 inches for classic ties, narrower for slim styles.
Making your own pattern
Trace an existing tie or draft one using paper and a ruler. Add seam allowances to all edges.
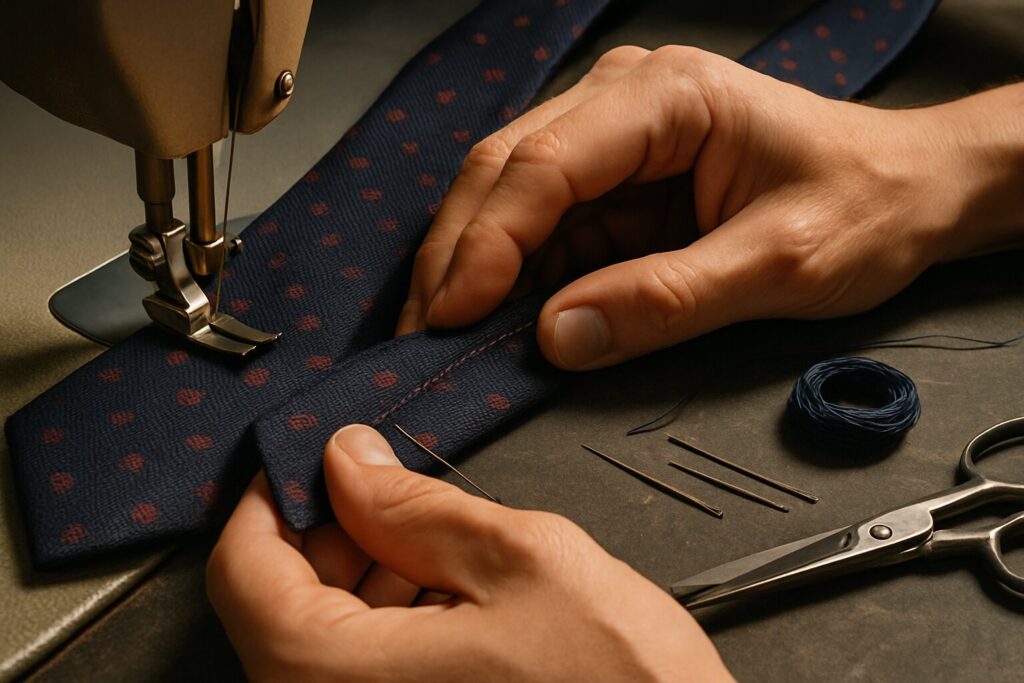
Step-by-Step Guide: How to Sew a Tie
Step 1: Cut your pieces
Cut the main tie fabric, interlining, and tipping pieces. Ensure all main pieces are cut on the bias.
Step 2: Join the main sections
Most ties are made from three sections sewn together. Match seams carefully and press open.
Step 3: Attach the tipping
Sew small fabric pieces to both ends of the tie. Turn and press for a clean finish.
Step 4: Insert the interlining
Place the interlining on the wrong side of the tie fabric. Fold the fabric edges over the interlining, creating a long envelope.
Step 5: Sew the long seam
Slip stitch by hand along the length of the tie. Hand stitching allows flexibility and prevents puckering.
Step 6: Press the tie
Use a pressing cloth to avoid scorching delicate fabrics. Shape the tie as you press to achieve a crisp, professional look.
Step 7: Add the keeper loop
Cut a small strip of fabric, fold, and stitch it to the back of the tie. This holds the tail neatly in place.
Advanced Tie-Making Techniques
Self-tipping vs. contrast tipping
- Self-tipping uses the same fabric as the main tie.
- Contrast tipping adds visual interest with a different fabric.
Bar tacks
Reinforce the ends of the tie with small hand-sewn bar tacks to maintain shape.
Adding a label
Sew a custom label to the back for a professional touch.
Customizing Tie Styles
Skinny ties
Narrow the width of your pattern for a modern, sleek look.
Wide ties
Broaden the blade for a retro or statement style.
Bow ties
Adapt the pattern to create classic or pre-tied bow ties.
Matching Ties to Outfits
Formal occasions
Silk ties in solid colors or subtle patterns pair well with suits.
Casual wear
Cotton or knit ties work with blazers or denim jackets for a relaxed vibe.
Seasonal fabrics
Wool ties add warmth in winter, while linen ties are perfect for summer events.
Troubleshooting Common Issues
Puckered seams
Use a walking foot or adjust tension to avoid distortion on slippery fabrics like silk.
Uneven tips
Double-check seam allowances and trim before turning the tips right side out.
Stiff or floppy ties
Experiment with different interlining weights to find the right balance.
Caring for Handmade Ties
Storage
Roll ties loosely or hang them to prevent creases.
Cleaning
Spot-clean stains immediately. Silk ties should be professionally cleaned.
Pressing
Use low heat and a pressing cloth to avoid damaging delicate fabrics.
Creative Tie Ideas
Patchwork ties
Combine small fabric pieces for a unique, colorful accessory.
Embroidered ties
Add monograms or motifs for a personalized touch.
Recycled fabric ties
Repurpose old shirts, scarves, or fabric scraps into stylish ties.
Practicing Your Skills
Start with cotton
Cotton is easier to handle and perfect for practice ties.
Experiment with widths
Try making multiple ties at different widths to see what styles you prefer.
Create matching sets
Make coordinating bow ties or pocket squares for a complete look.
Final Words
Sewing a tie may seem like a small project, but it’s one that showcases craftsmanship and attention to detail. By learning how to cut fabric on the bias, work with interlining, and hand-finish seams, you can produce ties that look and feel professional. With endless fabric and style options, every tie you create can reflect your personal taste or make a meaningful handmade gift.
Take your time with each step, enjoy the process, and soon you’ll have a collection of ties that rival those found in high-end stores — all made by you.